
![]() This post provides a visual step-by-step guide to installing Git on a Windows machine and integrating it into Visual Studio. By the end of this guide you’ll be able to use Git as a source code management (SCM) system for all of your Visual Studio projects, and hopefully start to appreciate why Git has become such a huge success.
This post provides a visual step-by-step guide to installing Git on a Windows machine and integrating it into Visual Studio. By the end of this guide you’ll be able to use Git as a source code management (SCM) system for all of your Visual Studio projects, and hopefully start to appreciate why Git has become such a huge success.
For those not so familiar with Git it’s a free and open-source Distributed Version Control System (DVCS) developed back in 2005 by a very famous developer in the software world named Linus Torvalds. It’s considered “the SCM” of choice in many circles and for good reason. It’s fast, simple, distributed, can support projects of any size and a variety of workflows. If you want to read more visit the Git Book website – it’s a free online resource for learning about Git.
As a brief aside, this post is followed by another titled: “Adding a Local Git Repository to GitHub: Step-By-Step Guide” so please check it out if you want to get working with GitHub.
Assumptions
I wanted to quickly cover off several assumptions before we get started:
- You don’t need a GitHub account – I’ll cover off GitHub integration in my next post
- You’re running Visual Studio – any recent version is fine, as long as it’s not an Express version
- You’re familiar with basic Git terminology, i.e. repository, commit, etc.
Step 1 of 3. Install Git for Windows
The first step is to get Git installed on Windows (the following screenshots were taken from v1.8.0-preview at the time of writing).
So download “Git for Windows” (also referred to by some as “msysgit”). The download links are on the top-right of the home page. Once downloaded run the executable. The first screen you’ll see looks like so. Click “Next >” to proceed:

Click “Next >” again.

Choose an installation directory and click “Next >”.

Select the same options chosen in the screenshot below and click “Next >”.
These options install a number of shortcuts, and two tools we’ll be referring this post and the following; Git GUI and Git Bash.

Choose the folder name and click “Next >”.

Select the “Run Git from the Windows Command Prompt” and click “Next > “.

Choose the “Checkout Windows-style, commit Unix-style line endings” and click “Next > “.

Give the application a moment to install…

And you’re done! Great.

So at this point you’ve got Git installed.
Step 2 of 3. Install the Visual Studio Extension: Git Source Control Provider
With Git now installed we need to get Visual Studio talking to it. Unfortunately Visual Studio doesn’t talk to Git out of the box but thankfully there is a free tool that bridges the gap: “Git Source Control Provider” (I’m currently running Visual Studio 2012 and the version of Git Source Control Provider is v1.0.1)
Start by firing up Visual Studio and navigating via the menu to TOOLS > EXTENSIONS AND UPDATES….
In the “Extensions and Updates” dialog ensure you’ve selected “Online” on the left and then search for “Git Source Control Provider” using the search field on the right.

Click the “Download” button and let it install. You’ll need to restart Visual Studio once it’s installed.
Restart Visual Studio and go to TOOLS > OPTIONS… in Visual Studio and navigate to the “Source Control” section. Within this section you’ll see an option to select the current source control plug-in. Choose “Git Source Control Provider”.

Once you change the option to “Git Source Control Provider” you’ll see the following window appear. If you accidentally close it don’t worry, it will reappear when you run (F5) your project for the first time (granted your plug-in is still set to use Git Source Control Provider):
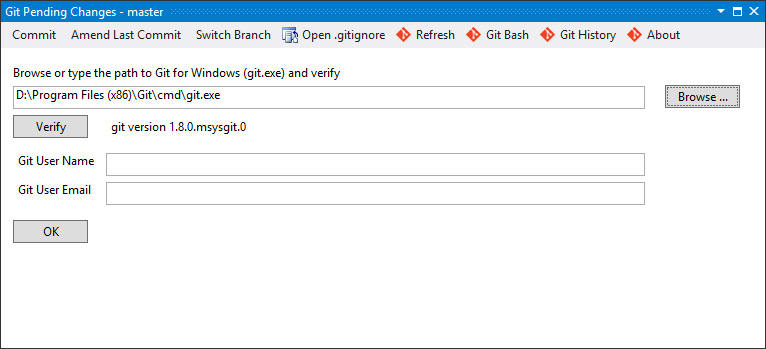
So populate the fields; select the git.exe location and enter your Git User Name and Email. The git.exe will be in your installation folder from the previous step, just look under the “cmd” folder. The user name and email are used by Git when it’s labeling your commits.
And that’s it as far as Visual Studio is concerned. You’re now ready to get your Visual Studio solutions talking to Git.
Side note: don’t worry if you’re running Team Foundation Server (TFS) projects, it’s easy to switch between those and Git projects without any hassles.
Step 3 of 3. Add a Visual Studio Solution to Git
So at this point everything is plumbed up, you just need to get a solution into Git – the easiest part 🙂
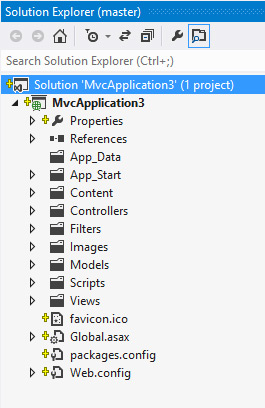
Create a new Visual Studio solution, I’ve chosen an MVC4 web application. At this point there will be no source control management so you need to add the solution to Git by right-clicking the solution file in the “Solution Explorer” toolbox. Halfway down you’ll see the “Create Git Repository” option – select it.

You’ll see an immediate update of the icons next to each project file, yellow plus signs, as illustrated below:
So in the background the “Git Source Control Provider” has created a local Git repository and is ready to commit the new files/folders to it.
Lets commit the new files/folders now by right-clicking on the solution in the “Solution Explorer” and selecting the option “Git Pending Changes”.

The “Git Pending Changes” window will appear and look similar to this:

Enter in a comment, tick the checkbox on the left list header so that it auto-selects all the others, then click on the “Commit” option in the very top-left of the dialog.
If you give it a moment to do it’s work you’ll see the “Changes files” list update and your “Solution Explorer” window will now reflect the commits:
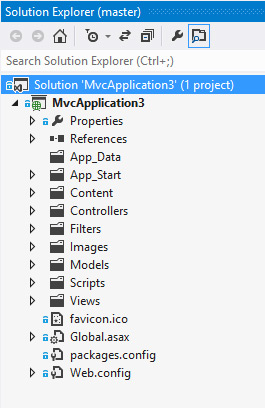
Excellent the files/folders are now committed – see those lovely blue lock icons next to your files. You can add, edit and delete files and folders and if you look at the “Git Pending Changes” window you’ll see it update accordingly. The icons will also change in the “Solution Explorer” toolbox accordingly which is very handy.
You can even go to the root folder for the solution in Windows Explorer and add a file and that will appear in the “Git Pending Changes” window as well – nothing gets missed.
Conclusion
As you can guess there is a lot more you can do from here with Git. For example you can see from the screenshot below that I’ve dropped a new file into the root folder of the solution “README.txt” and it appears in the “Git Pending Changes” windows. In addition, I’ve deleted a few lines from the “Global.asax” in Visual Studio and the same dialog shows me what I’ve done with a nice diff comparison.

Hopefully this is enough to get you started developing with Visual Studio and Git.
Good luck and do check out my follow-up blog which covers pushing your local repository up to GitHub.
